Installation
This guide will help you get started with Front-Commerce by installing it.
Preparation
This guide will walk you through the steps to configure your system for
installing Front-Commerce packages from our private npm package repository using
a global .npmrc file.
Prerequisites
Front-Commerce is a closed source product. This documentation supposes that you have access to our private repositories.
Access is granted to teams that have signed the relevant legal contracts, either as a Partner, a Customer or for a Time-Limited Trial. Please contact us if you need help or further information.
Before you begin, ensure that you have the following:
- A Blackswift Gitlab account authorized to access our Front-Commerce private workspace
- A
Blackswift Gitlab Personal Access Token
with the
read_apiscope - Node.js and npm installed on your machine
Step 1: Create a Blackswift Gitlab Personal Access Token
- Log in to your Blackswift Gitlab account.
- Navigate to your Profile and click on Access Tokens.
- Click on the Add new token button.
- Enter a name for your token and select the
read_apiscope. - Click on the Create personal access token button.
- Copy the token value as you will need it in the next step.
Step 2: Create a .npmrc file
- Create a
.npmrcfile on your system (see npm documentation for more information), with the following content:
//gitlab.blackswift.cloud/api/v4/projects/24/packages/npm/:_authToken=<your_token_value>
@front-commerce:registry=https://gitlab.blackswift.cloud/api/v4/projects/24/packages/npm/
- Replace
<your_token_value>with the token value you copied in Step 1.
Conclusion
Congratulations! You should now be able to install Front-Commerce packages. If you encounter any issues during the installation process or are looking for alternatives, please refer to the official Gitlab documentation or contact our support team for assistance.
Installation
- Using our Skeleton (Remix Stack)
- In an existing project
This is the recommended way to start a new Front-Commerce project.
- Open your terminal and run the following command (it uses
pnpm, but you can usenpxif you prefer):
NPM_CONFIG_LEGACY_PEER_DEPS=true pnpm dlx create-remix@latest hello-v3 --template https://new.front-commerce.app/ -y
- Wait for the installation process to complete and follow the prompts
- Create another
.npmrcin the project root with the following content:
legacy-peer-deps=true
NPM_CONFIG_LEGACY_PEER_DEPSThis option (or legacy-peer-deps=true in .npmrc) is currently required when
using @front-commerce/compat. This is due to the Apollo version used in 2.x
being incompatible with the latest version graphql versions used now.
When not using @front-commerce/compat, it is not required. We still have some
usages in Front-Commerce core in the current stable version. Please bare with
us!
This is not something we expect you to do for now, as you'll have to edit your
entry.*.ts files, server.ts and your root route with Front-Commerce specific
code.
Instead of documenting these changes that could evolve, we prefer that you contact our support team. We'll provide a friendly and up-to-date guidance in a timely fashion! Deal?
Configure your project
You must now configure your project to use Front-Commerce's extensions adapted
to your context. Edit the front-commerce-config.ts file to configure your
project, and create a .env file with essential configurations. Here are some
examples:
- Minimal install
- Magento2
- Magento1
Use Front-Commerce without any extension: only the default theme with static data. Useful for evaluation purposes, but quickly limited.
import { defineConfig } from "@front-commerce/core/config";
import themeChocolatine from "@front-commerce/theme-chocolatine";
import storesConfig from "./app/config/stores";
import cacheConfig from "./app/config/caching";

export default defineConfig({
  extensions: [themeChocolatine()],
  stores: storesConfig,
  cache: cacheConfig,
  configuration: {
    providers: [],
  },
  v2_compat: {
    useApolloClientQueries: true,
    useFormsy: true,
  },
});
Finally, create a .env file with the following content:
# Front-Commerce configuration
FRONT_COMMERCE_ENV=development
FRONT_COMMERCE_URL=http://localhost:4000
FRONT_COMMERCE_HOST=localhost
FRONT_COMMERCE_PORT=4000
FRONT_COMMERCE_COOKIE_PASS=cookie-secret
FRONT_COMMERCE_SITEMAP_TOKEN=sitemap-secret
FRONT_COMMERCE_CACHE_API_TOKEN=cache-api-secret
Use Front-Commerce with a headless Magento2 instance.
import { defineConfig } from "@front-commerce/core/config";
import themeChocolatine from "@front-commerce/theme-chocolatine";
import magento2 from "@front-commerce/magento2";
import storesConfig from "./app/config/stores";
import cacheConfig from "./app/config/caching";

export default defineConfig({
  extensions: [magento2({ storesConfig }), themeChocolatine()],
  stores: storesConfig,
  cache: cacheConfig,
  configuration: {
    providers: [],
  },
  v2_compat: {
    useApolloClientQueries: true,
    useFormsy: true,
  },
  pwa: {
    appName: "Front-Commerce",
    shortName: "Front-Commerce",
    description: "My e-commerce application",
    themeColor: "#fbb03b",
    icon: "assets/icon.png",
    maskableIcon: "assets/icon.png",
  },
});
Learn more about configuring the Magento2 extension and the prerequisites.
# Front-Commerce configuration
FRONT_COMMERCE_ENV=development
FRONT_COMMERCE_URL=http://localhost:4000
FRONT_COMMERCE_HOST=localhost
FRONT_COMMERCE_PORT=4000
FRONT_COMMERCE_COOKIE_PASS=cookie-secret
FRONT_COMMERCE_SITEMAP_TOKEN=sitemap-secret
FRONT_COMMERCE_CACHE_API_TOKEN=cache-api-secret

# Magento2 configuration (see https://developers.front-commerce.com/docs/3.x/extensions/magento2#configuration)
FRONT_COMMERCE_MAGENTO2_ENDPOINT=https://magento2.example.com
FRONT_COMMERCE_MAGENTO2_CONSUMER_KEY=xxxxxxxxx
FRONT_COMMERCE_MAGENTO2_CONSUMER_SECRET=xxxxxxxxx
FRONT_COMMERCE_MAGENTO2_ACCESS_TOKEN=xxxxxxxxx
FRONT_COMMERCE_MAGENTO2_ACCESS_TOKEN_SECRET=xxxxxxxxx
Use Front-Commerce with a headless Magento1 instance.
import { defineConfig } from "@front-commerce/core/config";
import themeChocolatine from "@front-commerce/theme-chocolatine";
import magento1 from "@front-commerce/magento1";
import storesConfig from "./app/config/stores";
import cacheConfig from "./app/config/caching";

export default defineConfig({
  extensions: [magento1({ storesConfig }), themeChocolatine()],
  stores: storesConfig,
  cache: cacheConfig,
  configuration: {
    providers: [],
  },
  v2_compat: {
    useApolloClientQueries: true,
    useFormsy: true,
  },
});
Learn more about configuring the Magento1 extension and the prerequisites.
# Front-Commerce configuration
FRONT_COMMERCE_ENV=development
FRONT_COMMERCE_URL=http://localhost:4000
FRONT_COMMERCE_HOST=localhost
FRONT_COMMERCE_PORT=4000
FRONT_COMMERCE_COOKIE_PASS=cookie-secret
FRONT_COMMERCE_SITEMAP_TOKEN=sitemap-secret
FRONT_COMMERCE_CACHE_API_TOKEN=cache-api-secret

# Magento1 configuration
FRONT_COMMERCE_MAGENTO1_ENDPOINT=https://magento1.example.com
FRONT_COMMERCE_MAGENTO1_CONSUMER_KEY=xxxxxxxxx
FRONT_COMMERCE_MAGENTO1_CONSUMER_SECRET=xxxxxxxxx
FRONT_COMMERCE_MAGENTO1_ACCESS_TOKEN=xxxxxxxxx
FRONT_COMMERCE_MAGENTO1_ACCESS_TOKEN_SECRET=xxxxxxxxx
Start the application
You should now be able to start the application without errors by running the
dev command using your favorite package manager (we recommend
pnpm):
pnpm dev
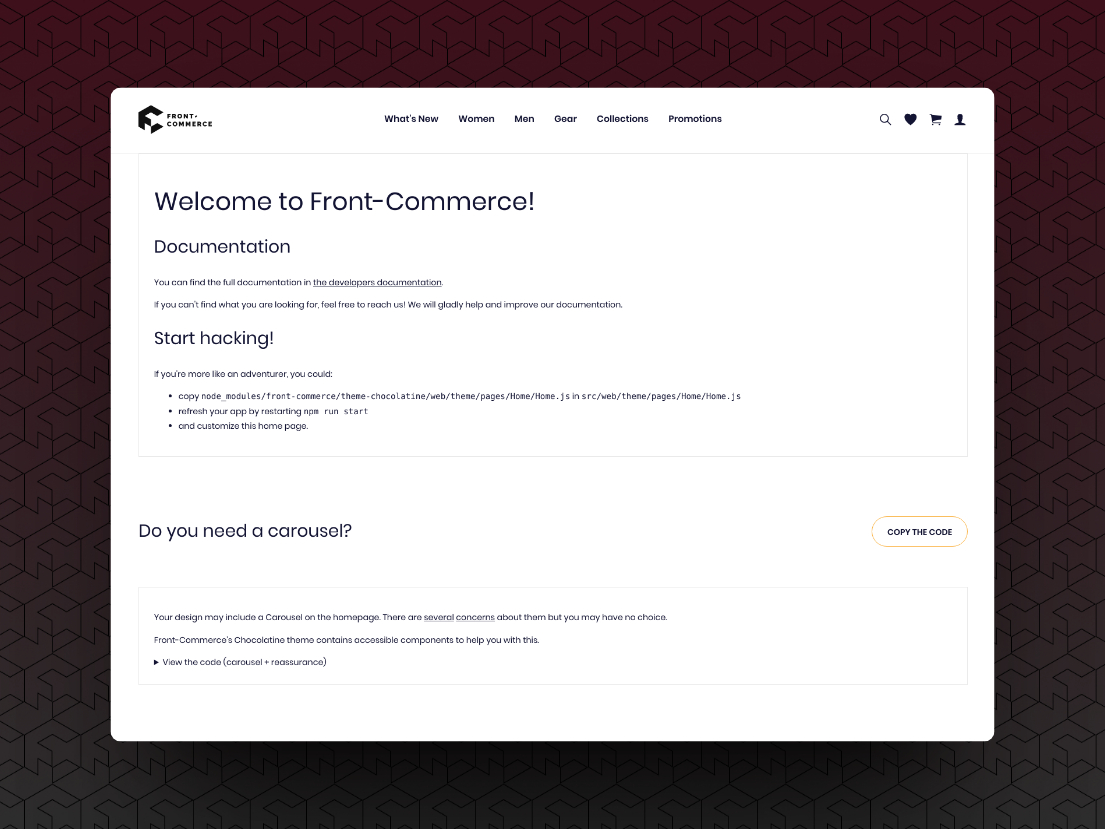
🎉 Congrats, you should now see this screen when opening http://localhost:4000/!
