Authorize.net
This guide explains how Front-Commerce allows using Authorize.net in a headless commerce project.
Authorize.net is a payment gateway service that allows customers to securely make online payments. It provides a seamless integration for processing credit card transactions.
Magento1 (OpenMage LTS)
Since version 2.26
Prerequisites
This feature is directly provided by Magento (OpenMage LTS), but requires the Front-Commerce Magento module in version >= 1.5.0.
Enable Authorize.net in Magento
This feature is directly provided by Magento (OpenMage LTS). Since documentation is sparse nowadays on internet, we provide an example that worked for us and our customers. In case of doubt don't hesitate to contact us and Authorize.net support.
Go to the
System > Configuration > Sales > Payment Methods > Authorize.net (Deprecated)
admin section and configure it after your requirements. Ensure that Enabled =
Yes, so it appears in the payment list in your Front-Commerce checkout.
If you already process payments with Authorize.net, the configuration should work without any changes.
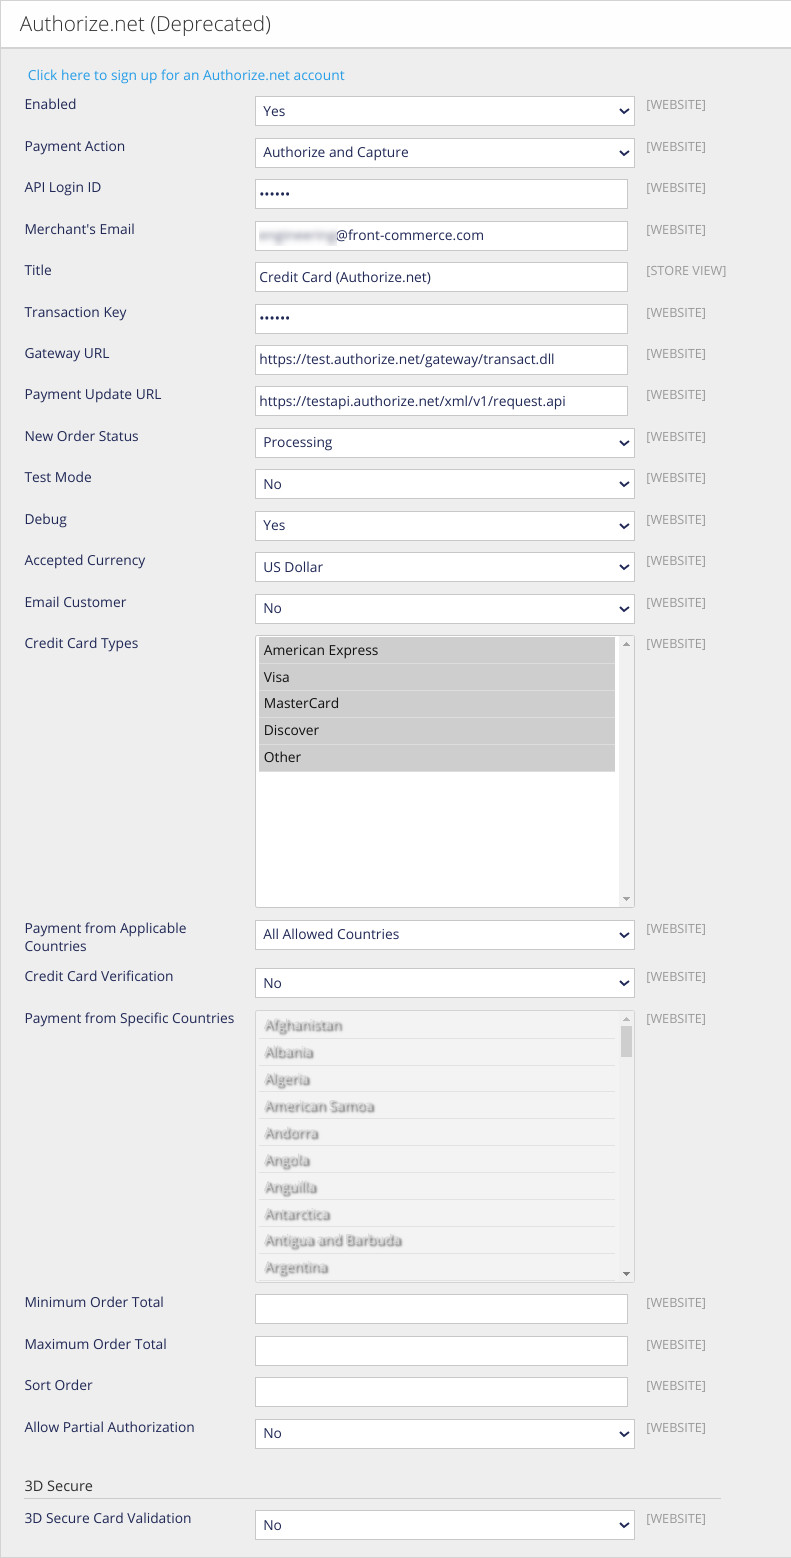
Example configuration for a test environment
For detailed documentation about how to use Authorize.net, please visit the Authorize.net developer documentation.
Some highlights of this configuration:
- URLs are for the test services. Here are the URLs you could use:
- Sandbox:
- Gateway URL: https://test.authorize.net/gateway/transact.dll
- Payment Update URL: https://apitest.authorize.net/xml/v1/request.api
- Production:
- Gateway URL: https://secure.authorize.net/gateway/transact.dll
- Payment Update URL: https://api.authorize.net/xml/v1/request.api
- Sandbox:
- API login ID and Transaction Key are for the test environment. To retrieve
them
(source):
- For sandbox API requests, log into the sandbox Merchant Interface at https://sandbox.authorize.net. For production API requests, log into the production Merchant Interface at https://account.authorize.net.
- Navigate to Account > Settings > API Credentials & Keys.
- Click New Transaction Key.
- Click Submit.
- Request and verify a PIN in order to see the transaction key.
- Debug mode is optional
- Test mode is optional

Register the AuthorizeNetForm component in Front-Commerce
-
Override the file that lets you register additional payments components in Front-Commerce
mkdir -p my-module/web/theme/modules/Checkout/Payment/AdditionalPaymentInformation/
cp -u node_modules/front-commerce/src/web/theme/modules/Checkout/Payment/AdditionalPaymentInformation/getAdditionalDataComponent.js my-module/web/theme/modules/Checkout/Payment/AdditionalPaymentInformation/getAdditionalDataComponent.js -
Register the component
AuthorizeNetFormto be used forauthorizenetpayments ingetAdditionalDataComponent.jsmy-module/web/theme/modules/Checkout/Payment/AdditionalPaymentInformation/getAdditionalDataComponent.js-const ComponentMap = {};
+import AuthorizeNetForm from "./AuthorizeNetForm";
+const ComponentMap = {
+ authorizenet: AuthorizeNetForm,
+};
const getAdditionalDataComponent = (method) => {
return ComponentMap[method.code];
Restart Front-Commerce and test
After having restarted Front-Commerce, you should be able to use this payment method when available.
You can find Test cards on Authorize.net documentation.