Add a new attribute
Front-Commerce allows you to leverage Magento attributes in your application. This guide explains the different steps involved by going through a concrete example.
Let's say we want to add a new element to display on a product's page (for instance, a product's rate). You will have to:
- Add an attribute to your Magento 2.
- Expose the attribute in your GraphQL schema.
- Display it on screen.
Add a value to your database
The process to do so may vary with the backend software you are using. For Magento 2 (used in this example), you can refer to How to Create Product Attributes in Magento 2.
Expose the attribute in your GraphQL schema
We want to display the rate of a product on the product page. To keep it
simple, it will only consist in displaying a number, which can be manually
edited by the merchant. This feature will be stored in a new module called
my-module.
You could directly edit the files at
node_modules/front-commerce/path/to/something, but this is not recommended
since running npm install might erase any modification. You can learn
how to extend the GraphQL schema.
Let's create a new module along with its folder structure. At the root of your repository, type the following command.
mkdir -p my-module/server/modules/ratings
Add the module to Front-Commerce
Now we will add the module we just made to Front-Commerce. Edit the
.front-commerce.js file (root folder) as shown below to do so.
module.exports = {
  name: "Front-Commerce Skeleton",
  url: "http://localhost:4000",
- modules: ["./src"],
+ modules: ["./my-module", "./src"],
  serverModules: [
    { name: "FrontCommerce", path: "server/modules/front-commerce" },
-   { name: "Magento2", path: "server/modules/magento2" }
+   { name: "Magento2", path: "server/modules/magento2" },
+   { name: "Ratings", path: "./my-module/server/modules/ratings" }
  ]
};
Expand the Product definition
First, we need to tell the server how to customise the GraphQL schema. To do so,
we will create a file named schema.gql and type the following code. It means
that we are expanding the definition of a product: it can now be rated.
extend type Product {
  rate: Float
}
Implement the resolver
We must now define what Front-Commerce should fetch when rate is requested in
a GraphQL query; in other words we must write the code that will resolve the
queries for the rates.
Create a file named resolvers.js and type the following code. It implements
the resolver.
export default {
  Product: {
    rate: ({ rate }) => parseFloat(rate),
  },
};
Declare the module
If we want our code to be taken into account when the module is loaded, we must reference it.
In the file named index.js, type the following code. It references the schema
and the resolver from earlier.
import typeDefs from "./schema.gql";
import resolvers from "./resolvers";

export default {
  namespace: "Ratings",
  typeDefs: typeDefs,
  resolvers: resolvers,
};
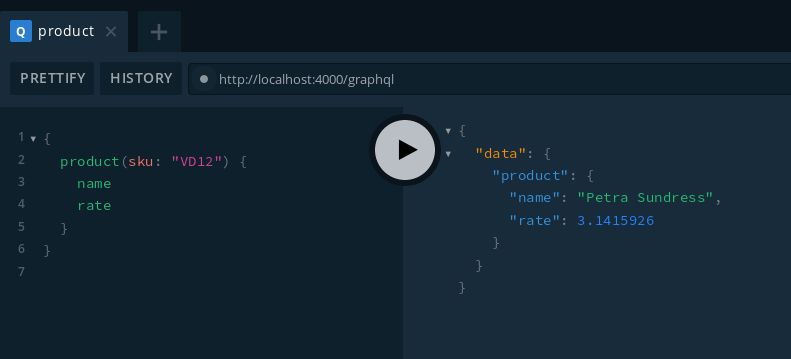
Discover the playground
By typing yourhostname/playground or yourhostname/graphiql (in our case
localhost:4000/playground) in your browser address bar, you can access a
GraphQL playground with a nice GUI to test your queries. For instance, type the
following code in the left pane and press Ctrl + Enter (or click the
play button).
You will need to restart the application to access the updated schema in the playground.
And here is a screenshot of the GraphQL query.

{
  product(sku: "yourSKUhere") {
    name
    rate
  }
}
From this GraphQL query, you should get a JSON content that looks like this:
{
  "data": {
    "product": {
      "name": "Your product name",
      "rate": // the value stored in your backoffice (Magento 2 in this case)
    }
  }
}
Display the attribute in a product page
Now that you have access to your attribute, you can display it however you want in your React application. In this example, we will add it on the product's page, in the right section.
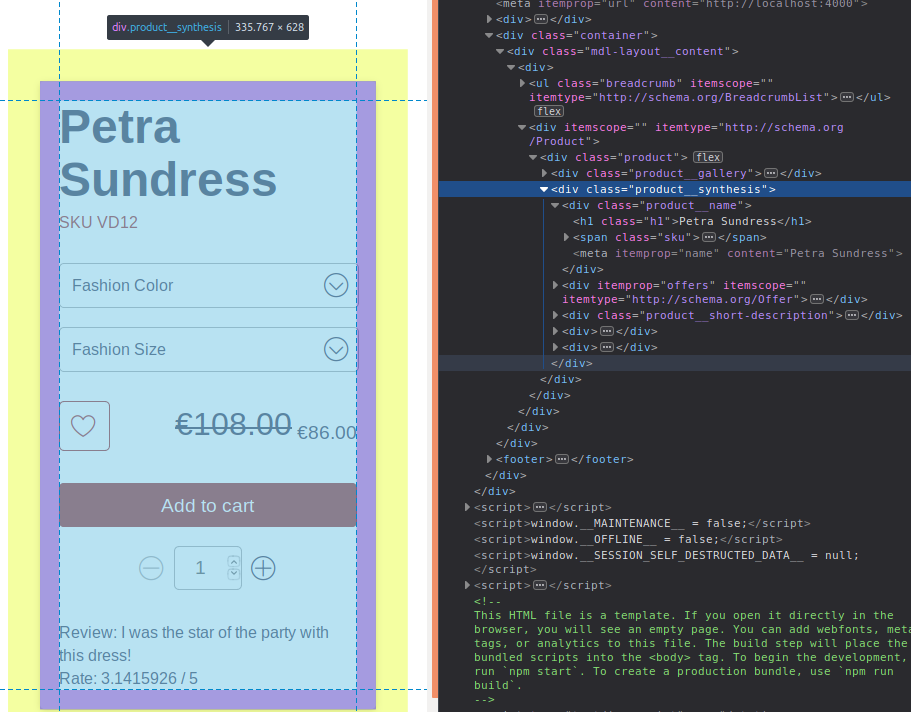
How to find which files to edit
On your web page, right click on the element you wish to edit, then click on
Inspect Element. In the inspector, you can look for the class that holds
the elements you want to edit. Here, the class is product__synthesis.

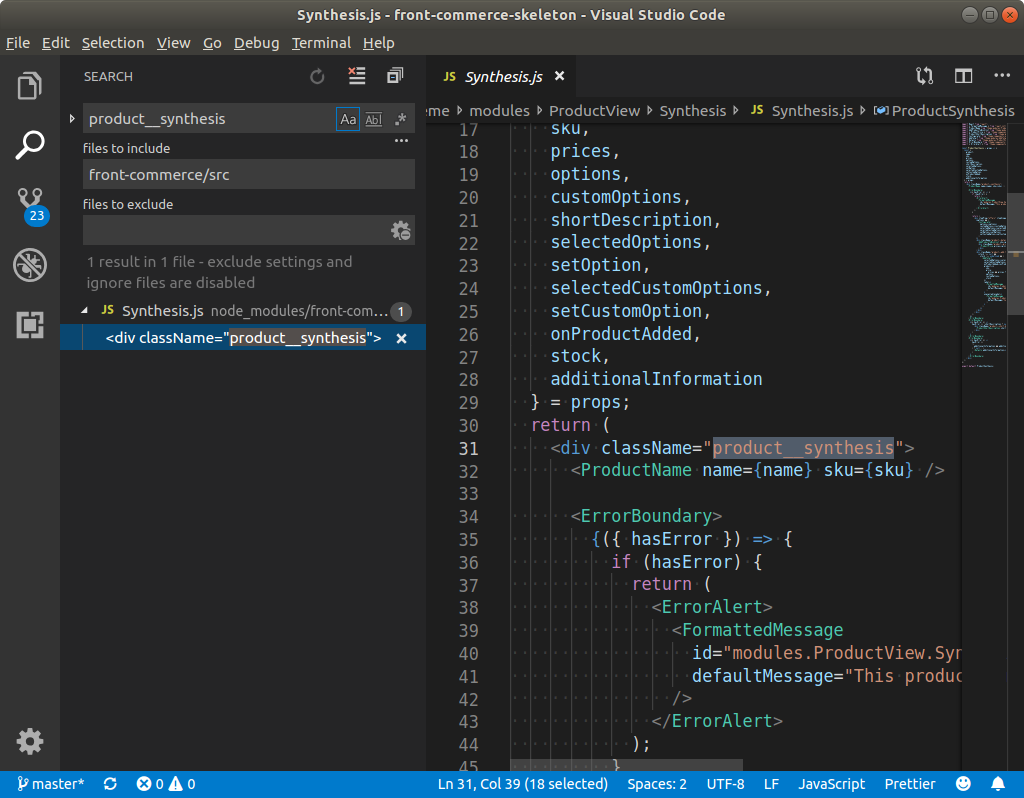
Then you can search for that keyword in your node_modules/front-commerce/src
folder and you will find the right files.

Overriding the files
In this example, the files to be overridden are
ProductSynthesisFragment.gql and Synthesis.js both located at
node_modules/front-commerce/src/web/theme/modules/ProductView/Synthesis/. Copy
and paste them into my-module/web/theme/modules/ProductView/Synthesis.
See Extend the theme for more details.
Once you have created the new files, restart your application to ensure that these are used instead of the core ones.
Updating the query
In
my-module/web/theme/modules/ProductView/Synthesis/ProductSynthesisFragment.gql,
add the following query line. It means that the application will request the
rate field as well when sending the query. (Depending on the version of
Front-Commerce you are using, the content might differ slightly.)
#import "theme/components/organisms/Configurator/ProductConfiguratorFragment.gql"
#import "theme/modules/AddToCart/ProductStockFragment.gql"
#import "theme/components/atoms/Typography/Price/ProductPriceFragment.gql"
#import "theme/modules/ProductView/Details/ProductDetailsFragment.gql"

fragment ProductSynthesisFragment on Product {
  sku
  name
  ...ProductPriceFragment
  description
  rate
  ...ProductConfiguratorFragment
  ...ProductStockFragment
  ...ProductDetailsFragment
  configurations {
    product {
      sku
      ...ProductPriceFragment
    }
  }
}
GraphQL queries can be split in Fragments and each fragment is supposed to live
next to a component in order to easily request all the data needed for your
component. Thus, since we need to display some new data on the
ProductSynthesis component, we update the ProductSynthesisFragment.
Displaying the result on screen
We're almost there! In the file Synthesis.js (which generates the product
page), you can add some code to display the rate. Knowing React.js or at least
HTML syntax is necessary to perform this step without impacting other items on
the page.
// Many more things here
const ProductSynthesis = (props) => {
  const {
    product,
    // Many more things here
  } = props;
  return (
    <div className="product__synthesis">
      {/* Many more things here */}
      <div>Rate: {product.rate} / 5</div>
      {/* Many more things here */}
    </div>
  );
};

export default ProductSynthesis;
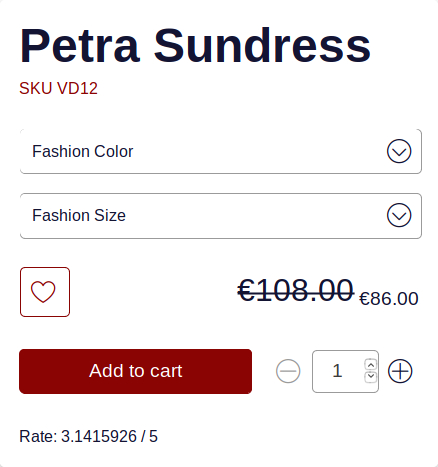
Conclusion
Here is a screenshot of the final result on the product page.

We suggest you try to add your own custom attribute, just to make sure you understood the concepts and you master the process.